How to manage invoices with the CLI and an editor
Here’s a common thing we often hear: if you’re doing a task more than once, automize it!

A few years ago as I did my first freelance gigs, I hacked a LaTeX template I found on Internet to be able to build my own invoices. I even wrote an article in French about that.
But then, I found myself repeating the edition of the different elements of the invoice and figured that I could actually automize it some more, so that I don’t need to edit the LaTeX code itself, just the relevant elements in the LaTeX code.
That’s how I ended up creating a tool to generate invoices based on a list. It’s called CLAIT, which is a lame acronym for Command Line Accounting and Invoicing Tool, and it’s not affiliated to the CLIT.

What the tool does is take some bits of configuration in YAML, runs it against a template in LaTeX, and generate a bunch of PDF, one for each invioce. And it also caculates your montly, quarterly or yearly earnings so you can copy paste the value when you got to fill the tax form in!
How to use the tool?
Well, you shall first install it:
pip install clait
And then, you need to create a directory where you want to do your accounting. That directory will serve as a sort of repository for your accounting. CLAIT expects two files to be in that directory.
Configuration of the invoices repository
The first file: invoices_config.yaml, is to bring the information that are global to all your
invoices, such as the template you need, the path to the pdflatex executable
tool — which can be absurd, especially for mac users — and the elements expected
by the template that has been chosen — usually the name, contact info, firm registration
and bank account — which are the elements that will be used by all the invoices.
All invoices_config.yaml will contain:
format: french
tools:
    pdflatex: /usr/local/texlive/2014/bin/universal-darwin/pdflatex
source:
And within the source key, you’ll find elements that are usually put in the
header and the footer of your invoice. Typically for the french template:
source:
    name: Ford Prefect
    address:
        - Hyperspace bypass
        - Earth
    telephone: +44 777 7777 7777
    website: http://mostly.harmless.com
    email: ford.prefect@mostly.harmless.com
    siren: 111 222 333
    ape: 9602A
    bank:
        rib:
            - 00001
            - 00002
            - 00000000001
            - 42
        iban: FR42 0000 1000 0200 0000 0000 142
        bics: FOOBARFUBAR
Managing invoices in the invoices repository
The other file is the invoices list, invoices_list.yaml. There you define all the elements that will
identify your customer, and your invoice:
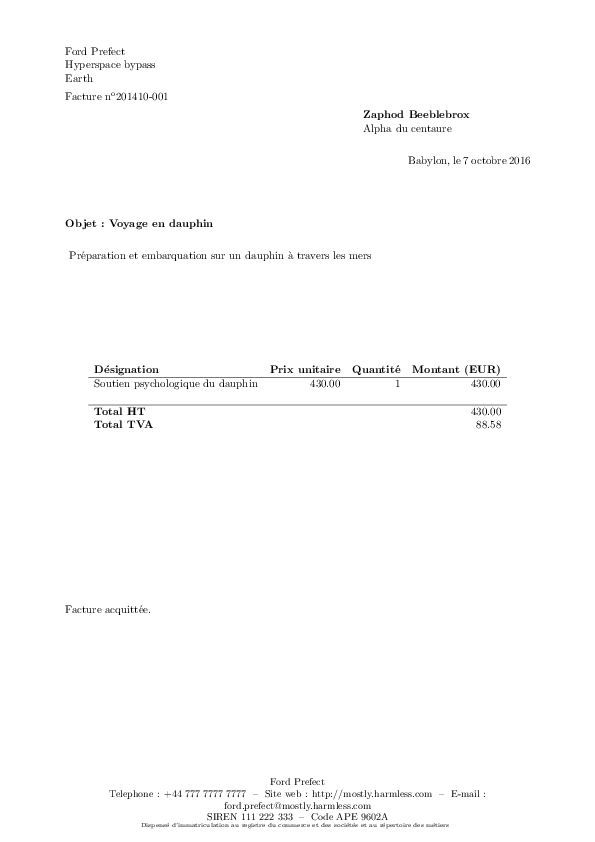
- !invoice
  iid: 201410-001
  date: 2014-10-02
  kind: paid
  subject: Voyage en dauphin
  desc: "Pr\xE9paration et embarquation sur un dauphin \xE0 travers les mers"
  customer: !customer
    address: [Alpha du centaure]
    name: Zaphod Beeblebrox
  place: Babylon
  products:
    …
The iid is the unique id of the invoice, that will be used as the generated
invoice file name, and shown as reference on the PDF itself. it’s a choice to
keep it user settable, as everybody has a different scheme, and I prefered
not to automize this to avoid enforcing a way over another.
The kind key, is to define the status of the invoice. Whether it has been issued
as a quote, or is a paid invoice or not. If it’s a quote, the template will be
setup to state the invioce as such, and if it’s been paid, it will have a mention.
Otherwise, it will contain a banner telling how you want to be paid.
The question mark words !product, !customer… Are there to help the parser
identify each element and give better feedback in case of mistakes.
The products key is aimed to contain a list of products, either !product or !offer,
an offer being a product of negative value (when doing a discount for example). So
each product will generate a line in the invoice, and to make a multiline description
you can give it a list of lines in the yaml.
  products:
  - !product
    descr: Soutien psychologique du dauphin
    price: 430
    qty: 1
  - !offer
    descr: Discount because I'm nice
    price: 20
    qty: 1
Once you’ve configured both files, you can run
clait generate
if you’re within the directory, or
clait -d /path/to/directory generate
if you’re not. If you don’t like the idea of an invoice directory, or you don’t like the default names of the files, you can also setup path for each file independently:
clait -l /path/to/invoices_list.yaml -c /path/to/invoices_config.yaml -d /path/where/to/output generate
Then you’ll find all your invoices with the iid as name, and .pdf as extension.
if you want to regenerate an invoice you modified, you just delete the pdf and rerun
the command.
How does the template work?
A template is defined by defining only 6 elements, the header, the footer, the product, the offer, the customer, and the invoice — which is the global template containing the others. If you want to define your own template, use an existing one as base work to adapt it to your own language and crounty specific needs.
The whole idea of the tool is to generate an invoice as a latex letter with a little logic within that will make it nicer.
So in the french template, you’ll find the functions to add products defined in the
HEADER part, and the “rendering” defined in the FOOTER part. The important tip
I can give, is to keep using all expected keys for each part the same way.
So, that means:
HEADER: expects NO paramaters,INVOICE:HEADER,iid,kind,place,subject,desc,customer,products,FOOTER;PRODUCT:descr,qty,price;CUSTOMER:name,address;FOOTER:telephone,website,email, … (everything that you defined assourcein the configuration file above)
Beware that a side effect of using raw python format() as a templating scheme
is that whenever you need to write latex curly braces, you have to double them,
such as \begin{center} will become \begin{{center}}, as all elements like
{iid} will be interpreted as an expected value to receive. As the HEADER part
is not parameterized, this is the only one that can be written as raw LaTeX!
Then once you wrote your template elements, you build a dict with the six elements as
keys, call register_template() on it with the name of your template:
from ..formatter import register_template

register_template('my_custom_template', dict(
   HEADER='',
   FOOTER='',
   INVOICE='',
   PRODUCT='',
   OFFER='',
   CUSTOMER=''
))
And finally that file shall be placed in the src/clait/format/templates directory
to be automagically loaded by CLAIT. Then using format: my_custom_template in the
config of your invoices repository will have you load the template you created for
each invoice!
I guess we might consider at some point using one of the powerful templating engines that exists, instead of using a raw and rough way of implementing it.
Extra features
Then, having all your invoices nicely handled by the tool is a nice thing, but then every quarter or every year you need to know your income for taxes declaration. Here you can get just that using:
% clait results quarterly
Quartely results:
 2014-Q4: 631
 2015-Q1: 70.75
or
% clait results yearly
Yearly results:
 2014 631
 2015 70.75
And there you go! You just got to copy paste that 😉
Frontend work
Finally, I have prepared the tool to expose an UI. Just run it as clait api and your
repository will be accessible through a RESTful API exposed using flask, and will offer
a Redux+React UI that’s still under heavy development. The point, here, is to use a web
frontend to mutate the invoices list, and eventually store it back into the YAML file.
The restful API is defined in a separate module, and the API exposed is kept as simple as possible. Here are the resources:
/results: gives an object withyearly,quarterlyandmonthlyas keys and the proper matching values./invoices: with a GET, it gives the paginated list of all invoices, with a POST it creates a new invoice (DELETE is not yet implemented)/invoices/<iid>: gives the invoice of invoice id:<iid>. Either it’s giving it as JSON, or theactionget parameter is set to download, it will generate the PDF and offer it for download.
/customers: Here is a nice trick, you can get the list of the customers extracted from the existing invoices. Which is useful for doing an invoice for a customer that already exists.
No access control is setup, as the webapp is meant to be ran only locally. Maybe support for multiple users and multiple repositories might be added in a distant future?
Then any request to / is meant to offer the Redux+React webapp. But that part is yet
to be finished! I’ll update the article when it will be over 😉
Look of the invoice
Finally, here’s how the invoice looks like:
The tool is located at: